Websockets Minigame with Angular and ASP.net Core
Introduction
The web socket protocol allows continuous two way communication between a client(web browser) and a server.This method of communications allows a server to push information to the client without the client having to do a request every time. It is an improvement of the old method of repeatedly pinging a server for information, by reducing the push to the client to only happen when an appropriate change occurs. In the .Net ecosystem the process of setting up a web server to handle serving the website and acting as a websocket server is made easier with the middleware of the asp.net core platform.
The Plan
- We will create a asp.net core web api project and set it up to server a SPA application
- We will create an angular web project
- We will use asp.net core’s Websocket middleware to create a websocket endpoint for our application
- We will create a service class that will act as a singleton that will handle all connected users and the information related to them, This class will also be responsible for handling all websocket requests and responses.
- We will modify our angular site to contain a service that will create the websocket connection and handle all messages to and from the server.
- We will update the default app componetn(home page) to use the websocket service class to create a very simple game of colored squares that will change color when a user click them.
In the end we will hope to make this:
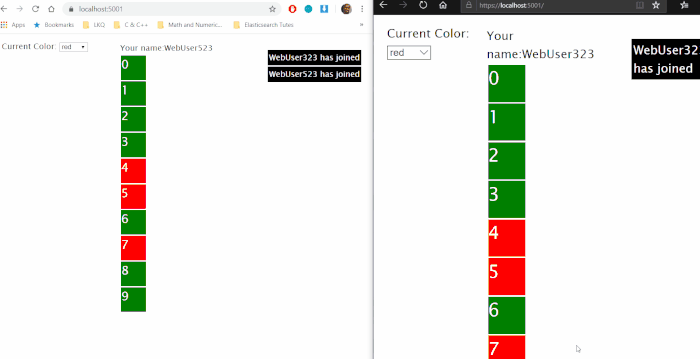
When a user connects they are given a random username and it is broadcasted to everyone. When a user selects a color and clicks a square, the squares color is changed and this change is broadcasted to all and a message indicating what was changed and who changed it is sent.
What you’ll need
.Net Core Core SDK(I’m using 3.1 , but 3.0 should be OK)
Node Package Manager
A good IDE.(I’m using Visual Studio 2019 Community version)
The server
First , we’ll create the web project. Open your command prompt. I’m using powershell.
dotnet new sln --name WebSocketAndNetcore
dotnet new webapi --name WebSocketAndNetcore.Web --output .
dotnet sln add .\WebSocketAndNetcore.Web.csproj
rm .\WeatherForecaset.cs
rm .\Controllers\WeatherForecastController.cs
dotnet restore .\WebSocketAndNetcore.sln
Install the NuGet packages needed to serve the angular application
dotnet add package Microsoft.AspNetCore.SpaServices
dotnet add package Microsoft.AspNetCore.SpaServices.Extensions
Startup.cs
Let’s check out our changes that we have done to the startup class
using System;
using System.Collections.Generic;
using System.Linq;
using System.Threading.Tasks;
using Microsoft.AspNetCore.Builder;
using Microsoft.AspNetCore.Hosting;
using Microsoft.AspNetCore.HttpsPolicy;
using Microsoft.AspNetCore.Mvc;
using Microsoft.Extensions.Configuration;
using Microsoft.Extensions.DependencyInjection;
using Microsoft.Extensions.Hosting;
using Microsoft.Extensions.Logging;
using Microsoft.AspNetCore.SpaServices.AngularCli;
using System.Net.WebSockets;
namespace WebSocketAndNetCore.Web
{
    public class Startup
    {
        public Startup(IConfiguration configuration)
        {
            Configuration = configuration;
        }
        public IConfiguration Configuration { get; }
        // This method gets called by the runtime. Use this method to add services to the container.
        public void ConfigureServices(IServiceCollection services)
        {
            services.AddControllers();
            services.AddSpaStaticFiles(config => config.RootPath = "wwwroot");
            services.AddSingleton(typeof(SquareService), new SquareService());
        }
        // This method gets called by the runtime. Use this method to configure the HTTP request pipeline.
        public void Configure(IApplicationBuilder app, IWebHostEnvironment env)
        {
            if (env.IsDevelopment())
            {
                app.UseDeveloperExceptionPage();
            }
            app.UseStaticFiles();
            app.UseSpaStaticFiles();
            app.UseHttpsRedirection();
            app.UseRouting();
            app.UseAuthorization();
            app.UseEndpoints(endpoints =>
            {
                endpoints.MapControllers();
            });
            app.UseWebSockets();
            app.Use(async (context, next) =>
            {
                if (context.Request.Path == "/ws")
                {
                    if (context.WebSockets.IsWebSocketRequest)
                    {
                        var socket = await context.WebSockets.AcceptWebSocketAsync();
                        var squareService = (SquareService)app.ApplicationServices.GetService(typeof(SquareService));
                        await squareService.AddUser(socket);
                        while (socket.State == WebSocketState.Open)
                        {
                            await Task.Delay(TimeSpan.FromMinutes(1));
                        }
                    }
                    else
                    {
                        context.Response.StatusCode = 400;
                    }
                }
                else
                {
                    await next();
                }
            });
            app.UseSpa(config =>
            {
                config.Options.SourcePath = "client-app";
                if (env.IsDevelopment())
                {
                    config.UseAngularCliServer("start");
                }
            });
        }
    }
}
Let’s explain what we’re doing
public void ConfigureServices(IServiceCollection services)
        {
            services.AddControllers();
            services.AddSpaStaticFiles(config => config.RootPath = "wwwroot");
            services.AddSingleton(typeof(SquareService), new SquareService());
        }
A lot of the initial setup of the application as far as it relates to setting up dot net core web applications to ser SPAs is the same I have done before in other articles such as Securing a Website Using Firebase,Andgular, and .Net Core . A lot of the process explained there will be the same here
In the configure service method the main changes are the AddStaticFiles method where we are setting up the application to server a SPA(single page application). We are setting to root directory of our client application to be the wwwroot folder. When we create our angular application, we will make sure we set the output directory to be “wwwroot” as part of the build process. Next we add the “SquareService” class to the services collection marking it as a singleton instance. This class is the meat of the server application where it keeps up with the current state of the square game and the relationship between the players and their connected websockets. We will review it later.
// This method gets called by the runtime. Use this method to configure the HTTP request pipeline.
        public void Configure(IApplicationBuilder app, IWebHostEnvironment env)
        {
            if (env.IsDevelopment())
            {
                app.UseDeveloperExceptionPage();
            }
            app.UseStaticFiles();
            app.UseSpaStaticFiles();
            app.UseHttpsRedirection();
            app.UseRouting();
            app.UseAuthorization();
            app.UseEndpoints(endpoints =>
            {
                endpoints.MapControllers();
            });
            app.UseWebSockets();
            app.Use(async (context, next) =>
            {
                if (context.Request.Path == "/ws")
                {
                    if (context.WebSockets.IsWebSocketRequest)
                    {
                        var socket = await context.WebSockets.AcceptWebSocketAsync();
                        var squareService = (SquareService)app.ApplicationServices.GetService(typeof(SquareService));
                        await squareService.AddUser(socket);
                        while (socket.State == WebSocketState.Open)
                        {
                            await Task.Delay(TimeSpan.FromMinutes(1));
                        }
                    }
                    else
                    {
                        context.Response.StatusCode = 400;
                    }
                }
                else
                {
                    await next();
                }
            });
            app.UseSpa(config =>
            {
                config.Options.SourcePath = "client-app";
                if (env.IsDevelopment())
                {
                    config.UseAngularCliServer("start");
                }
            });
        }
In the Configure method we start of by adding the middleware that handles the SPA setup for us:
app.UseStaticFiles();
app.UseSpaStaticFiles();
Next we will look at the portion that does the heavy lifting for setting up and handling our websocket request
app.UseWebSockets();
            app.Use(async (context, next) =>
            {
                if (context.Request.Path == "/ws")
                {
                    if (context.WebSockets.IsWebSocketRequest)
                    {
                        var socket = await context.WebSockets.AcceptWebSocketAsync();
                        var squareService = (SquareService)app.ApplicationServices.GetService(typeof(SquareService));
                        await squareService.AddUser(socket);
                        while (socket.State == WebSocketState.Open)
                        {
                            await Task.Delay(TimeSpan.FromMinutes(1));
                        }
                    }
                    else
                    {
                        context.Response.StatusCode = 400;
                    }
                }
                else
                {
                    await next();
                }
            });
First and foremost we are setting up our application to handle websocket request by using the provided middleware extension method:
app.UseWebSockets();
Next we do a dynamic custom middleware function:
[...]
app.Use(async (context, next) =>
            {
                if (context.Request.Path == "/ws")
                {
                    if (context.WebSockets.IsWebSocketRequest)
                    {
                        var socket = await context.WebSockets.AcceptWebSocketAsync();
                        var squareService = (SquareService)app.ApplicationServices.GetService(typeof(SquareService));
                        await squareService.AddUser(socket);
                        while (socket.State == WebSocketState.Open)
                        {
                            await Task.Delay(TimeSpan.FromMinutes(1));
                        }
                    }
                    else
                    {
                        context.Response.StatusCode = 400;
                    }
                }
                else
                {
                    await next();
                }
            });
[...]
First, we will inform our application that we will want to do something different when handling request made to the “ws” path:
if (context.Request.Path == "/ws")
{
 [...]
When request are made to this path, we will then check to see if it is a websocket request. This is checking for request made through the websocket protocall for example call made to ws://localhost/ws will be intercepted by this middleware function
if (context.WebSockets.IsWebSocketRequest)
{
[...]
[..]
var socket = await context.WebSockets.AcceptWebSocketAsync();
var squareService = (SquareService)app.ApplicationServices.GetService(typeof(SquareService));
await squareService.AddUser(socket);
while (socket.State == WebSocketState.Open)
{
    await Task.Delay(TimeSpan.FromMinutes(1));
}
[..]
In this section we first get a reference to the socket connection after the client completes the handshake procedure and accepts the connection. Next we get a reference to the SquareService class. We use the ApplicationService.GetService method to do this. Since we declared the service as a singleton in ConfigureServices method, Every user will get a reference to the same instance. This allows us to keep up with the current connections we have and the current users, and the current state of the “game”. We then call the SquareService’s AddUser method passing in the current request’s socket connection. We will see that this method kicks off the handling of the request/response processing loop of the web socket. We then set a loop that checks for the status of the current connection. We do it every minute, but the time can be set differently.
app.UseSpa(config =>
            {
                config.Options.SourcePath = "client-app";
                if (env.IsDevelopment())
                {
                    config.UseAngularCliServer("start");
                }
            });
The other change we have done here is a couple more things to handle the SPA client application. We set the sourcecode path of the client application and we kick of the “npm start” command when in the Development env. This will start Angular’s real-time updates when you make changes while debugging the Angular application.
SquareService.cs
The meat of the server is this class which handles the Response/Request loop of the websockets current;y connected websockets.
using Newtonsoft.Json;
using System;
using System.Collections.Generic;
using System.Linq;
using System.Net.WebSockets;
using System.Threading;
using System.Threading.Tasks;
namespace WebSocketAndNetCore.Web
{
    public class SquareService
    {
        private Dictionary<string, WebSocket> _users = new Dictionary<string, WebSocket>();
        private List<Square> _squares = new List<Square>(Square.GetInitialSquares());
        public async Task AddUser(WebSocket socket)
        {
            try
            {
                var name = GenerateName();
                _users.Add(name, socket);
                GiveUserTheirName(name, socket).Wait();
                AnnounceNewUser(name).Wait();
                SendSquares(socket).Wait();
                while (socket.State == WebSocketState.Open)
                {
                    var buffer = new byte[1024 * 4];
                    WebSocketReceiveResult socketResponse;
                    var package = new List<byte>();
                    do
                    {
                        socketResponse = await socket.ReceiveAsync(new ArraySegment<byte>(buffer), CancellationToken.None);
                        package.AddRange(new ArraySegment<byte>(buffer, 0, socketResponse.Count));
                    } while (!socketResponse.EndOfMessage);
                    var bufferAsString = System.Text.Encoding.ASCII.GetString(package.ToArray());
                    if (!string.IsNullOrEmpty(bufferAsString))
                    {
                        var changeRequest = SquareChangeRequest.FromJson(bufferAsString);
                        await HandleSquareChangeRequest(changeRequest);
                    }
                }
                await socket.CloseAsync(WebSocketCloseStatus.NormalClosure, "", CancellationToken.None);
            }
            catch (Exception ex)
            { }
        }
        private string GenerateName()
        {
            var prefix = "WebUser";
            Random ran = new Random();
            var name = prefix + ran.Next(1, 1000);
            while (_users.ContainsKey(name))
            {
                name = prefix + ran.Next(1, 1000);
            }
            return name;
        }
        private async Task SendSquares(WebSocket socket)
        {
            var message = new SocketMessage<List<Square>>()
            {
                MessageType = "squares",
                Payload = _squares
            };
            await Send(message.ToJson(), socket);
        }
        private async Task SendAll(string message)
        {
            await Send(message, _users.Values.ToArray());
        }
        private async Task Send(string message, params WebSocket[] socketsToSendTo)
        {
            var sockets = socketsToSendTo.Where(s => s.State == WebSocketState.Open);
            foreach (var theSocket in sockets)
            {
                var stringAsBytes = System.Text.Encoding.ASCII.GetBytes(message);
                var byteArraySegment = new ArraySegment<byte>(stringAsBytes, 0, stringAsBytes.Length);
                await theSocket.SendAsync(byteArraySegment, WebSocketMessageType.Text, true, CancellationToken.None);
            }
        }
        private async Task GiveUserTheirName(string name, WebSocket socket)
        {
            var message = new SocketMessage<string>
            {
                MessageType = "name",
                Payload = name
            };
            await Send(message.ToJson(), socket);
        }
        private async Task AnnounceNewUser(string name)
        {
            var message = new SocketMessage<string>
            {
                MessageType = "announce",
                Payload = $"{name} has joined"
            };
            await SendAll(message.ToJson());
        }
        private async Task AnnounceSquareChange(SquareChangeRequest request)
        {
            var message = new SocketMessage<string>
            {
                MessageType = "announce",
                Payload = $"{request.Name} has changed square #{request.Id} to {request.Color}"
            };
            await SendAll(message.ToJson());
        }
        private async Task HandleSquareChangeRequest(SquareChangeRequest request)
        {
            var theSquare = _squares.First(sq => sq.Id == request.Id);
            theSquare.Color = request.Color;
            await SendSquaresToAll();
            await AnnounceSquareChange(request);
        }
        private async Task SendSquaresToAll()
        {
            var message = new SocketMessage<List<Square>>()
            {
                MessageType = "squares",
                Payload = _squares
            };
            await SendAll(message.ToJson());
        }
    }
}
It’s a little more to unpack here. Starting at the top we have these declarations:
private Dictionary<string, WebSocket> _users = new Dictionary<string, WebSocket>();
private List<Square> _squares = new List<Square>(Square.GetInitialSquares());
The “_user” dictionary is used to maintain a list of the current users and their websocket connection. Next is the “_squares” collection. This is the collection of the squares in that will be present in the UI and their id and color. this collection and it’s state will be shared between all users due to this class being instantiated as a singleton service.
public async Task AddUser(WebSocket socket)
        {
            try
            {
                var name = GenerateName();
                _users.Add(name, socket);
                GiveUserTheirName(name, socket).Wait();
                AnnounceNewUser(name).Wait();
                SendSquares(socket).Wait();
                while (socket.State == WebSocketState.Open)
                {
                    var buffer = new byte[1024 * 4];
                    WebSocketReceiveResult socketResponse;
                    var package = new List<byte>();
                    do
                    {
                        socketResponse = await socket.ReceiveAsync(new ArraySegment<byte>(buffer), CancellationToken.None);
                        package.AddRange(new ArraySegment<byte>(buffer, 0, socketResponse.Count));
                    } while (!socketResponse.EndOfMessage);
                    var bufferAsString = System.Text.Encoding.ASCII.GetString(package.ToArray());
                    if (!string.IsNullOrEmpty(bufferAsString))
                    {
                        var changeRequest = SquareChangeRequest.FromJson(bufferAsString);
                        await HandleSquareChangeRequest(changeRequest);
                    }
                }
                await socket.CloseAsync(WebSocketCloseStatus.NormalClosure, "", CancellationToken.None);
            }
            catch (Exception ex)
            { }
        }
The big loop. The “AddUser” method is the first called by the request when a successful socket connection is established. The first thing we do is call the GenerateName method which will generate a random unused name for the user. We then call “GiveUserTheirName” which will add the user to the “_users” dictionary and create the relationship between the user and their socket connection. We then will call the “AnnounceNewUser” method which will cycle through the current sockets and send a message announcing the new user’s connection. Next we call the “SendSquares” method. This will send the user the current collection of the squares. As you can see we are doing these send function synchronously. This is because of the nature of the websocket class. From experimentation with it, it seems like we can’t send asynchronously. So, pretty much to one connection we must send a message completely before we can send another. So, pretty much we wrote this in a way where we make sure we send something completely before we execute another send. We can do two way communication asynchronously though.
Next, let’s look at how we had to the receive loop:
while (socket.State == WebSocketState.Open)
                {
                    var buffer = new byte[1024 * 4];
                    WebSocketReceiveResult socketResponse;
                    var package = new List<byte>();
                    do
                    {
                        socketResponse = await socket.ReceiveAsync(new ArraySegment<byte>(buffer), CancellationToken.None);
                        package.AddRange(new ArraySegment<byte>(buffer, 0, socketResponse.Count));
                    } while (!socketResponse.EndOfMessage);
                    var bufferAsString = System.Text.Encoding.ASCII.GetString(package.ToArray());
                    if (!string.IsNullOrEmpty(bufferAsString))
                    {
                        var changeRequest = SquareChangeRequest.FromJson(bufferAsString);
                        await HandleSquareChangeRequest(changeRequest);
                    }
                }
First we are constantly checking the state of the connection to make sure that it is still open. Next we create an internal loop for receiving from the client. We do this by first creating a buffer to hold the data we receive from the socket.
var buffer = new byte[1024 * 4];
WebSocketReceiveResult socketResponse;
var package = new List<byte>()
Next our internal loop will read the data from the socket. If the socket message isn’t at it’s end, it will take that data and append it to the current package.
do
{
   socketResponse = await socket.ReceiveAsync(new ArraySegment<byte>(buffer), CancellationToken.None);
   package.AddRange(new ArraySegment<byte>(buffer, 0, socketResponse.Count));
} while (!socketResponse.EndOfMessage);
Finally, when we have fully received the entire method from the socket, we take that data and turn it into a string. We then take this string and convert it from JSON(which we will send from the client application) to our object that represents a request to change the state of the square collection by changing the color of a certain square.
if (!string.IsNullOrEmpty(bufferAsString))
{
   var changeRequest = SquareChangeRequest.FromJson(bufferAsString);
   await HandleSquareChangeRequest(changeRequest);
}
private async Task HandleSquareChangeRequest(SquareChangeRequest request)
        {
            var theSquare = _squares.First(sq => sq.Id == request.Id);
            theSquare.Color = request.Color;
            await SendSquaresToAll();
            await AnnounceSquareChange(request);
        }
This method HandleSquareChangeReqeuest pretty much takes a user square change request and changes the square in the collection to the new color, it then broadcasts the changed square collection to all users then announces the change to all users.
        private async Task Send(string message, params WebSocket[] socketsToSendTo)
        {
            var sockets = socketsToSendTo.Where(s => s.State == WebSocketState.Open);
            foreach (var theSocket in sockets)
            {
                var stringAsBytes = System.Text.Encoding.ASCII.GetBytes(message);
                var byteArraySegment = new ArraySegment<byte>(stringAsBytes, 0, stringAsBytes.Length);
                await theSocket.SendAsync(byteArraySegment, WebSocketMessageType.Text, true, CancellationToken.None);
            }
        }
The send message is the base message doing most of the work of this class. No matter what it’s sending it makes sure that the only ones that are getting the message are still open. It then will cycle through the sockets to send to and then converts the string to bytes and then calls the SendAsync method to send the message through the web socket. Most of the other methods are just methods that are using the “Send” method to send information.
The Angular Application
Let’s go back to the prompt and create the angular application. First, we’ll get the Angular CLI tool (if needed) and create the app.
npm install -g angular/cli
ng new client-app
mkdir wwwroot
Create the websocket service
ng generate service WebSocket
We will also create the classes that we will use to serialize and deserialize as JSON to send and receive from the server
ng generate class models/SocketMessage
ng generate class models/SquareChangeRequest
ng generate class models/Square
The code for these classes are:
square.ts
export class Square {
  Id: number;
  Color: string;
}
square-change-request.ts
export class SquareChangeRequest {
  Id: number;
  Color: string;
  Name: string;
}
socket-message.ts
export class SocketMessage {
  MessageType: string;
  Payload: any
}
Angular.json
Update this property on this file to change the “outputPath” to “wwwroot”. This will make sure that the directory that we set up in the .Net core SPA middleware is the one that the compiled angular application is set in.
[...]
"outputPath": "wwwroot"
[...]
app.module.ts
import { BrowserModule } from '@angular/platform-browser';
import { NgModule } from '@angular/core';
import { FormsModule } from '@angular/forms';
import { AppRoutingModule } from './app-routing.module';
import { AppComponent } from './app.component';
import { WebSocketService } from './web-socket.service';
@NgModule({
  declarations: [
    AppComponent
  ],
  imports: [
    BrowserModule,
    AppRoutingModule,
    FormsModule
  ],
  providers: [
    WebSocketService
  ],
  bootstrap: [AppComponent]
})
export class AppModule { }
The app module is pretty straight forward. The main noticeable difference being our reference to the FormsModule and making sure we set our WebSocketService in the providers collection.
web-socket.ts
import { Injectable } from '@angular/core';
import { SocketMessage } from './models/socket-message';
import { BehaviorSubject } from 'rxjs';
import { Square } from './models/square';
import { SquareChangeRequest } from './models/square-change-request';
@Injectable({
  providedIn: 'root'
})
export class WebSocketService {
  private socket: WebSocket;
  squares$: BehaviorSubject<Square[]> = new BehaviorSubject<Square[]>([]);
  announcement$: BehaviorSubject<string> = new BehaviorSubject<string>('');
  name$: BehaviorSubject<string> = new BehaviorSubject<string>('');
  private name: string;
  constructor() { }
  startSocket() {
    this.socket = new WebSocket('wss://localhost:5001/ws');
    this.socket.addEventListener("open", (ev => {
      console.log('opened')
    }));
    this.socket.addEventListener("message", (ev => {
      var messageBox: SocketMessage = JSON.parse(ev.data);
      console.log('message object', messageBox);
      switch (messageBox.MessageType) {
        case "name":
          this.name = messageBox.Payload;
          this.name$.next(this.name);
          break;
        case "announce":
          this.announcement$.next(messageBox.Payload);
          break;
        case "squares":
          this.squares$.next(messageBox.Payload);
          break;
        default:
          break;
      }
    }));
  }
  sendSquareChangeRequest(req: SquareChangeRequest) {
    req.Name = this.name;
    var requestAsJson = JSON.stringify(req);
    this.socket.send(requestAsJson);
  }
}
Just like our SquareService.cs class is responsible for most of the heavy lifting of the websocket servicer side, this service class is responsible for the heavy lifting client side. Let’s break down what;s going on.
private socket: WebSocket;
squares$: BehaviorSubject<Square[]> = new BehaviorSubject<Square[]>([]);
announcement$: BehaviorSubject<string> = new BehaviorSubject<string>('');
name$: BehaviorSubject<string> = new BehaviorSubject<string>('');
private name: string;
First, our declarations. We declare a WebSocket object to hold the reference to our javascript websocket object. Next, we declare multiple subjects. The squares$ subject will fire off when we receive an update to our collection of squares from the server. The accounement$ subject will fire off when we receive an update to our announcements from the server. Lastly the name$ subject is just to set the user’s name after we successfully connect our socket and receive one from the server.
StartSocket() method. The method where the magic happens:
this.socket = new WebSocket('wss://localhost:5001/ws');
First, we create the socket by calling our server using the websocket protocal and we set the path to “ws”. This will ensure that our connection request is caught by the websocket middleware we defined in the Startup.cs class.
this.socket.addEventListener("open", (ev => {
      console.log('opened')
    }));
Here we add the listener for the “open” event of the websocket. I simply just log this. The other messages are the one that we’ll be interested in.
this.socket.addEventListener("message", (ev => {
      var messageBox: SocketMessage = JSON.parse(ev.data);
      console.log('message object', messageBox);
      switch (messageBox.MessageType) {
        case "name":
          this.name = messageBox.Payload;
          this.name$.next(this.name);
          break;
        case "announce":
          this.announcement$.next(messageBox.Payload);
          break;
        case "squares":
          this.squares$.next(messageBox.Payload);
          break;
        default:
          break;
      }
    }));
  }
Here is the event listener for the “messae” event. When we receive a message from the server, we have made sure that messages from the server have the same format. All of the messages will deserialize into the messageBox class. This class has a “MessageType” property and has a payload which we know how to handle based on the type. When the message is the “name” type we know that we are receiving the message that sets the user name after connecting and we set that property in the service and then we broadcast it to any component subscribed to the “name$” subscription. The “announce” messages are just sent to the subscription. Finally when the message is “squares” type we know that we are getting our square collection refreshed.
sendSquareChangeRequest(req: SquareChangeRequest) {
    req.Name = this.name;
    var requestAsJson = JSON.stringify(req);
    this.socket.send(requestAsJson);
  }
This method is simply for sending the message to the server for a request for a color change to the squares. We set the name of who made the change and the id and new color of the square. The server will receive this request and then update the square collection and broadcast the changed set to all.
app.component.ts
import { Component } from '@angular/core';
import { WebSocketService } from './web-socket.service';
import { Square } from './models/square';
import { SquareChangeRequest } from './models/square-change-request';
@Component({
  selector: 'app-root',
  templateUrl: './app.component.html',
  styleUrls: ['./app.component.scss']
})
export class AppComponent {
  announcementSub;
  messages: string[] = [];
  squares: Square[] = [];
  colors: string[] = ["red", "green", "blue"];
  currentColor: string = "red";
  name: string = "";
  constructor(private socketService: WebSocketService) {
    this.socketService.announcement$.subscribe(announcement => {
      if (announcement) {
        this.messages.unshift(announcement);
      }
    });
    this.socketService.squares$.subscribe(sq => {
      this.squares = sq;
    });
    this.socketService.name$.subscribe(n => {
      this.name = n;
    });
  }
  ngOnInit() {
    this.socketService.startSocket();
  }
  squareClick(event, square: Square) {
    if (square.Color === this.currentColor)
      return;
    var req = new SquareChangeRequest();
    req.Id = square.Id;
    req.Color = this.currentColor;
    this.socketService.sendSquareChangeRequest(req);
  }
}
In the app component we utilize the websocket service to simply bind the necessary subscriptions to our services subjects.
announcementSub;
  messages: string[] = [];
  squares: Square[] = [];
  colors: string[] = ["red", "green", "blue"];
  currentColor: string = "red";
  name: string = "";
We have a subscription for the announcements that come in. When activated we will append these announcements to our “messages” array. The square array will be used to display the squares. When we receive an update from the server we will replace this array with the array sent from the server. The colors is the possible colors we can switch to and current color is used to bind the current color the user is using. The name string is……the user’s randomly generated name.
constructor(private socketService: WebSocketService) {
    this.socketService.announcement$.subscribe(announcement => {
      if (announcement) {
        this.messages.unshift(announcement);
      }
    });
    this.socketService.squares$.subscribe(sq => {
      this.squares = sq;
    });
    this.socketService.name$.subscribe(n => {
      this.name = n;
    });
  }
The constructor of this component is simply setting the subscriptions to the events that occur from the service which are kicked off from messages from the server.
squareClick(event, square: Square) {
    if (square.Color === this.currentColor)
      return;
    var req = new SquareChangeRequest();
    req.Id = square.Id;
    req.Color = this.currentColor;
    this.socketService.sendSquareChangeRequest(req);
  }
When a square is clicked, we will create a square change request object and send this request to the server.
app.component.html
This is the template for the app component and has the bindings of the squares from the server and a list that shows the current messages rolling in. Also we have the dropdown for selecting the color and the click event bindings that call for the request to change the color of a square.
<style>
  .flex-container {
    display: flex;
    flex-direction: row;
    justify-content: space-between;
    margin-right: 5px;
    margin-left: 5px;
    padding: 5px;
    font-family: 'Lucida Sans', 'Lucida Sans Regular', 'Lucida Grande', 'Lucida Sans Unicode', Geneva, Verdana, sans-serif
  }
  .flex-item {
    height: 500px;
    margin: 3px;
  }
    .flex-item ul {
      list-style: none;
    }
    .flex-item li {
      background-color: black;
      color: white;
      margin: 3px;
      padding:3px;
    }
</style>
<div class="flex-container">
  <div>
    Current Color:
    <select [(ngModel)]="currentColor">
      <option *ngFor="let color of colors" [value]="color">{{color}}</option>
    </select>
  </div>
  <div class="flex-item">
    <label>Your name:{{name}}</label>
    <div *ngFor="let square of squares" [style.background-color]="square.Color" style="color:white;font-size:24px;width:50px;height:50px;margin:2px;" (click)="squareClick($event,square)">
      {{square.Id}}
    </div>
  </div>
  <div class="flex-item">
    <ul>
      <li *ngFor="let message of messages">{{message}}</li>
    </ul>
  </div>
</div>
This is the majority of the code doing the work. You can start the app off by going to powershell and doing:
dotnet run
When the app fires off you should get a display of a dropdown with the selectable colors and a colleciton of the squares from the server. You should get a list kicked off that announces your connection to the website with your randomly generated name.
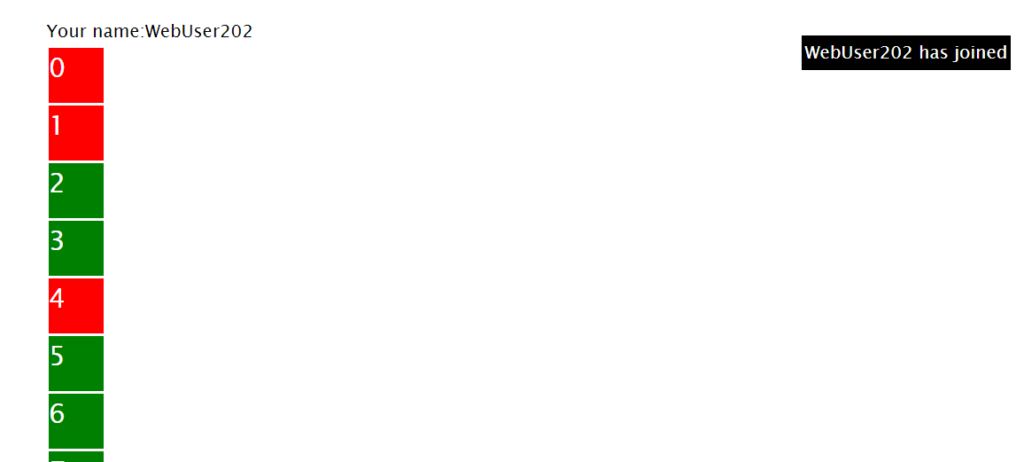
Next, start another connection to the website in another browser or from another computer. When this user connects the first user will see the announcement of their connection.
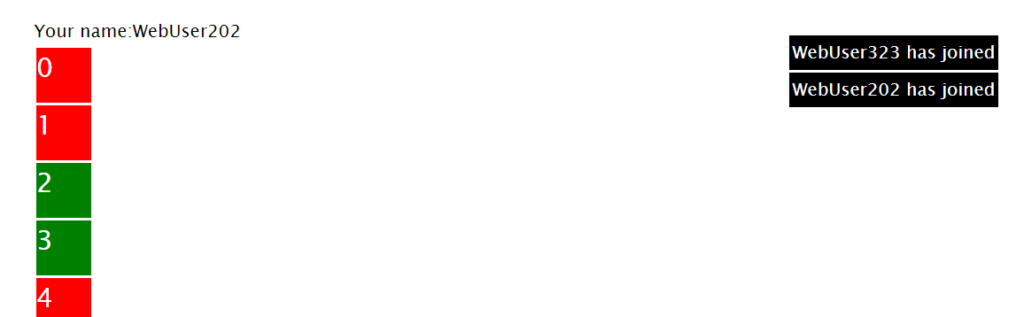
Now, all users can select a color and click a square changing it to that color. A user should try to change all the squares the same color.

SignalR and Socket.IO
The first question you may ask is “Well, why didn’t you use SignalR” or “Socket.IO”? SignalR is a .Net implementation of two way communication. Socket.IO is an open source another implementation of a wrapper for websockets. They both use websockets under the hood but also have fallbacks to other methods. I wanted to do this just using the basic “vanilla” web socket class and javascript implementation. The thing I did find out is how many things these libraries take care of for you, The first problem I ran into was the issues dealing with the whole asynchronous/synchronous issues that came from setting up the websocket class. SignalR does a great job of wrapping all of this up for you. On the client side vanilla javascript is “OK”, but client libraries like socket.io take care of all the stuff that you have to be very careful about like disconnections and queuing up messages correctly. The other thing that’s a concern is of course security. Libraries like SignalR have a definite advantage here because of how well they plug into the entire .Net ecosystem. The writers of these libraries have written them with concerns like security and concurrency in mind. So, my advice is unless you have some major technical restrictions that require just raw websockets, I would easily advise usiing one of these well vetted and well maintained libraries.
Other helpful Info